Thursday 22 October 2015

Proximity in IOS application


First of all what is proximity in IOS ?

Do you ever play audio in Whatsapp in iphone ? when it is playing far from the face its volume is high and when you take it near to your ear or face then you can hear the audio in Receiver from microphone. This functionality is implemented by checking proximity.

First  Proximity can not be checked in Ipod and Ipad , You can check whether your device support Proximity or not by implement this code.

      
UIDevice *device = [UIDevice currentDevice];
device.proximityMonitoringEnabled = YES;    

if (device.proximityMonitoringEnabled == YES) // yes your device support proximity
{
    NSLog(@"proximity enabled");
    [[NSNotificationCenter defaultCenter] addObserver:self selector:@selector(proximityChanged:) name:@"UIDeviceProximityStateDidChangeNotification" object:device];
} else {
    NSLog(@"proximity not enabled");
}


When proximity change you can change your avaudiosession property When your device is near to your face you can overrideOutputAudioPort to    AVAudioSessionPortOverrideNone and when your
device is far from your face you can overrideOutputAudioPort to    AVAudioSessionPortOverrideSpeaker so it will play in speaker

- (void) proximityChanged:(NSNotification *)notification {
    NSLog(@"proximity changed called");
    UIDevice *device = [notification object];
    AVAudioSession *audioSession = [AVAudioSession sharedInstance];
    BOOL success;
     success = [audioSession setCategory:AVAudioSessionCategoryPlayAndRecord error:nil];
    if(device.proximityState == 1){
        NSLog(@"bool %s", success ? "true" : "false");
        [audioSession overrideOutputAudioPort:AVAudioSessionPortOverrideNone error:nil];
        [audioSession setActive:YES error:nil];
    }
    else{
        NSLog(@"bool %s", success ? "true" : "false");
        [audioSession overrideOutputAudioPort:AVAudioSessionPortOverrideSpeaker error:nil];
        [audioSession setActive:YES error:nil];
        }
}


Now proximity should be off when it is not needed , that's why in viewWillAppear of each screen you should make it of and only when your audio is playing on it .

 -(void)viewWillAppear:(BOOL)animated
    {   
        [super viewWillAppear:animated];

        UIDevice *device = [UIDevice currentDevice];

        device.proximityMonitoringEnabled = NO;
    }

Monday 5 October 2015

StoryBoard Reference in Xcode 7


If you have multiple Storyboard in your project if you want to navigate from one storyboard to other storyboard until Xcode 6.4 you have to use this code  :

first make object of storyboard , then make object of that storyboard's view controller

      self.myProfileStoryboard = [UIStoryboard storyboardWithName:@"MyProfile"
                                                        bundle: nil];
     
      self.homeNavC = (AHKNavigationController*)[self.homeStoryboard
 
                                             instantiateViewControllerWithIdentifier: @"HomeViewControllerIDNavCntrl"];


But now in Xcode 7 you can use  Storyboard Reference


1) Make one storyboard , add one navigationController and add one ViewController name it FirstViewController


2) In First Storyboard add one storyboard Reference as under

3) Add  one ViewController in  second storyboard 
4) In second storyboard gave StoryboardId - SecondViewID for that viewController 


5)  Select FirstView Controller and gave the values as under:


Thats you done run your project and you can see you can navigate from one storyboard to another storyboard using StoryBoard Reference.


But this project you can not open now in previous xcode if you open you will see following error 


Friday 14 August 2015

Emoji support in ios Application

Open the emoji keyboard


You can find the emoji keyboard in any app that uses the standard keyboard. Tap in a text field, then tap Smiley face icon. If you have multiple keyboards turned on, press and hold Globe icon, then select Emoji


In iOS 8.3 and later, you can change the skin tone of some emoji. Tap and hold an emoji to see different skin tone variations. When you choose a skin tone, it will be saved as the default.


If you don't see the emoji keyboard
Make sure that the emoji keyboard is turned on:
  1. Tap Settings > General > Keyboard.
  2. Tap Keyboards.
  3. Tap Add New Keyboard.
  4. Tap Emoji.

Now how to support in IOS application 

In one of my application i have to send description in which i am adding smily :) . i have to encode the text and then send them and as well when i am displaying them i have to convert them . Lets see how.

When you send to server:


    NSString *uniText = [NSString stringWithUTF8String:[self.txtDesc.text UTF8String]];
    NSData *msgData = [uniText dataUsingEncoding:NSNonLossyASCIIStringEncoding];
    NSString *goodMsg = [[NSString alloc] initWithData:msgData encoding:NSUTF8StringEncoding] ;


and we display text do this way:


    -(NSString*)displayEmojiText:(NSString*)strText{
        NSData *emojiData = [strText dataUsingEncoding:NSUTF8StringEncoding];
        NSString *emojiString = [[NSString alloc] initWithData:emojiData encoding:NSNonLossyASCIIStringEncoding];
        return emojiString;
    }

[self.lblPostDescription setText:[APP_DELEGATE displayEmojiText:description]]

Thursday 28 May 2015

Learn Swift - Basics , Code Samples

In one of my application  i have to create it using swift technology , so i here describe you the basics of swift as well the problems that i faced during making that app


One of the Hazard!!!! How to use existing objective C classes in swift project


I can give very nice explanation how to use existing objective c classes in your project  :)


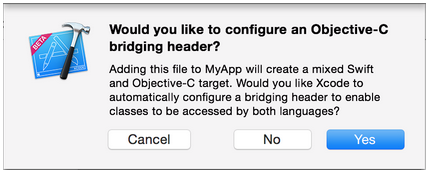
1> Whenever you are adding one existing class in your project Xcode
will ask…like this way If you give YES then you can see one bridging header will added in your project


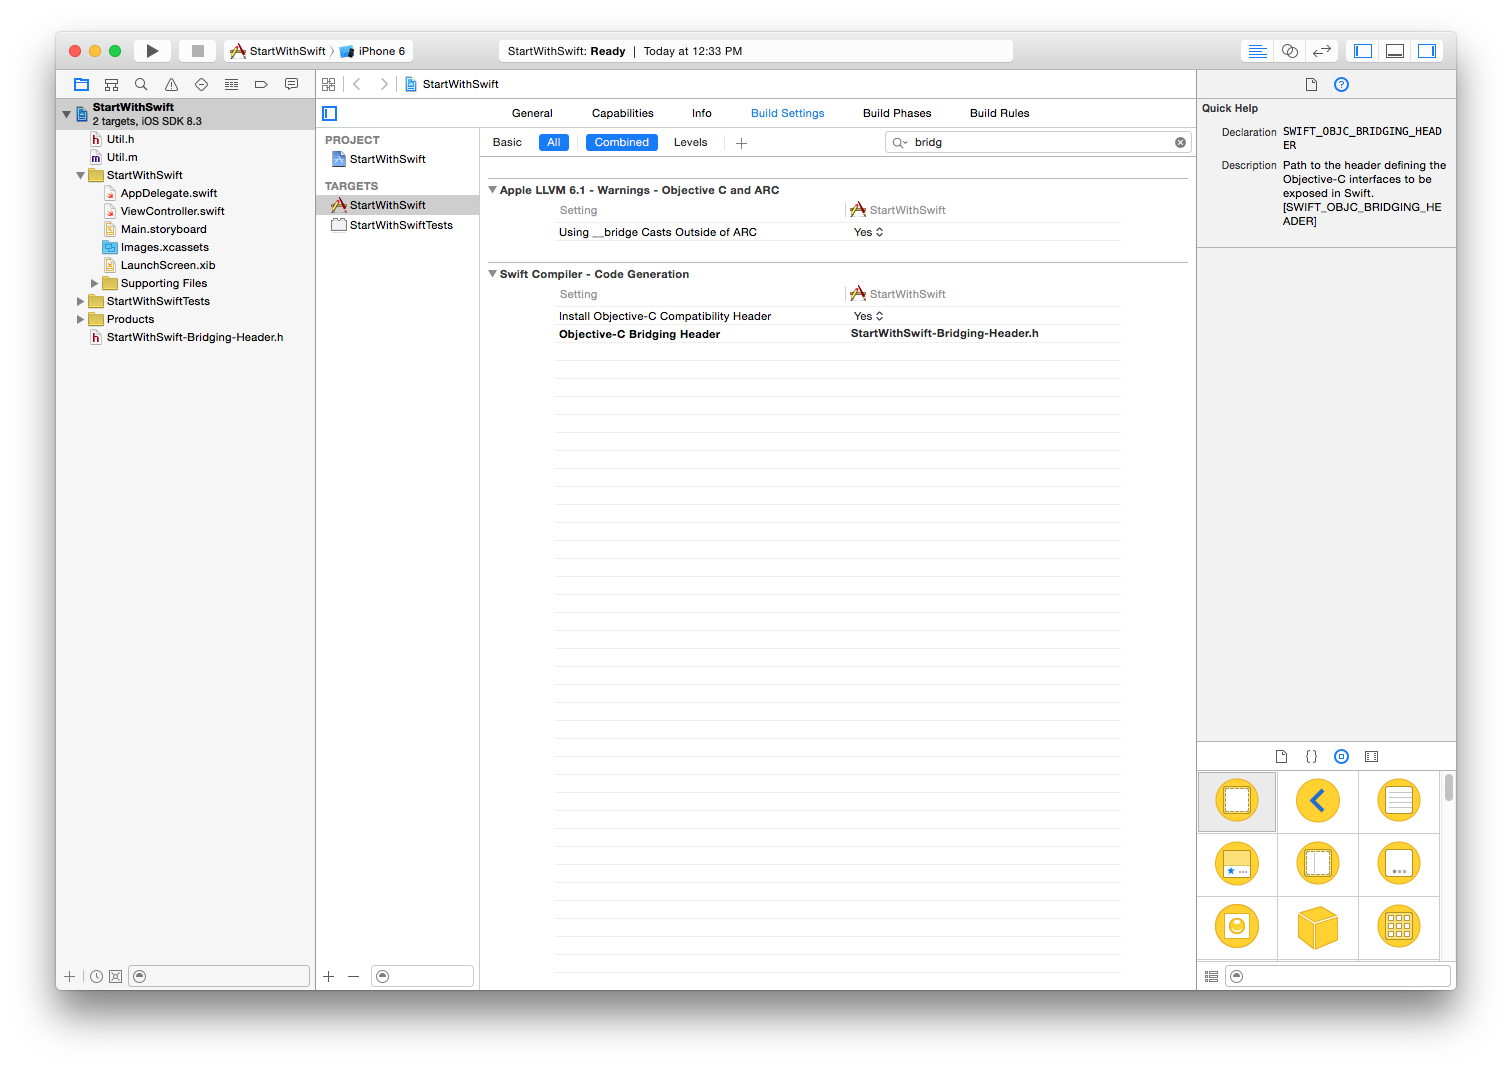
2> Now if you have not added bridging  file then you can add this way very easily.


add a new .h file to your project and name it <#YourProjectName#>-Bridging-Header.h
you have to give Objective c bridge header in build settings like this way :


   you can give path like this


$(SRCROOT)/Folder/Folder/<#YourProjectName#>-Bridging-Header.h


Screen Shot 2015-05-28 at 12.31.44 PM.png
In StartWithSwift-Bridging-Header you can define your objective c file like this way  #import "MBProgressHUD.h"


Now you can use in swift file MBProgressHUD code like this way:


class SignInViewCntrl: UIViewController,MBProgressHUDDelegate,Rest_APIDelegate{
   @IBOutlet var focusField : UITextField!


you can use MBProgressHUD open source code Progress hood this way:


MBProgressHUD *hud = [[self alloc] initWithView:view];
hud.removeFromSuperViewOnHide = YES;


vice versa you can even use your own swift file in objective C File:

Some of the basic rules when convert objective c code to swift


1) Notice that when creating a string literal to assign to the string variable, we don’t need the “@” for Swift.


      In Objective C We are not using @ for strings
      In Swift We are using let for creating constants


2) We are using let to create a constant


Use let to make a constant and var to make a variable.
let myConstant = 42


Values are never implicitly converted to another type. If you need to convert a value to a different type, explicitly make an instance of the desired type.


Example of this :


let label = "The width is "
let width = 94
let widthLabel = label + String(width)


Use \() to include a floating-point calculation in a string and to include someone’s name in a greeting.


3) you can create the arrays using the []


var shoppingList = ["catfish", "water", "tulips", "blue paint"]
shoppingList[1] = "bottle of wate”
var occupations = [   "Malcolm": "Captain",  
"Kaylee": "Mechanic", ]
occupations["Jayne"] = "Public Relations"


4)  difference in datatype


in swift you have to use Bool not BOOL


5) Make a class


Objective C


@implementation Shape
{
   int numberOfSides;
}
-(NSString*) simpleDescription {
   return [NSString stringWithFormat:@"A shape with (%d) sides.",numberOfSides];
}


Swift

class Shape {
  var numberOfSides = 0
  func simpleDescription() -> String {
      return "A shape with \(numberOfSides) sides."
  }
}


Create an instance of a class by putting parentheses after the class name. Use dot syntax to access the properties and methods of the instance.
var shape = Shape()
shape.numberOfSides = 7
var shapeDescription = shape.simpleDescription()
6) Calling a method:


Objective c


SpecificCar *myCar = [[SpecificCar alloc] init];
[myCar getOdometerReading];
Swift


var myCar = SpecificCar()
myCar.getOdometerReading()


7) Id is replaced with AnyObject


In Swift Id is replaced with AnyObject


8)Enums in Swift


enum MESSAGE_DURATION : Int {
   case MSG_DURATION_SHORT=2
   case MSG_DURATION_LONG=4
}
Here we are using case in swift we are not applying , after case  MSG_DURATION_SHORT=2


To access enum :


MESSAGE_DURATION.MSG_DURATION_SHORT


9) You can print the current value of a constant or variable with the println function:
println(friendlyWelcome)
10) Collection Types in swift
Swift provides three primary collection types, known as arrays, sets, and dictionaries,
Arrays, sets, and dictionaries in Swift are always clear about the types of values and keys that they can store. This means that you cannot insert a value of the wrong type into a collection by mistake.
Arrays
Creating a empty array using this way:

  • var someInts = [Int]()
  • someInts.append(3) //it add one object to array
  • someInts += [4]
you can declare array like this way
1>
  • var threeDoubles = [Double](count: 3, repeatedValue: 0.0)
  • Here the default value is 0.0
  • 2>
  • var shoppingList: [String] = ["Eggs", "Milk"]
you can check array is empty or not this way:
if shoppingList.isEmpty(){
}
Set
set stores distinct values of the same type in a collection with no defined ordering. 
   you can perform the same operation as in array for more info you can check
   Its very broad concept we can include it in next tutorial. 

11) Optional Chaining
What is it!!!!!!!!!!!


Optional Chaining allows us to chain multiple optionals together using dot-syntax, and conditionally check if each value in the chain exists. The optional chaining operator is:?.
By virtue of being optional It simple means In the code below, john has a residence property value of nil:
  • class Person {
  • var residence: Residence?
  • }
// Constant string that is declared as an optional.
let constantOptional: String? = "Test" 
// Variable string that is declared as an optional.
var variableOptional: String? = "Test"  
A runtime error is thrown if a non-optional constant/variable ever becomes nil
With optionals, testing is slightly simplified, as we don’t have to explicitly add a character to test for the non-existence of our testVar variable (see example block):
var testVar: String? = myRandomFunction() // May return nil
if testVar { // testVar is not nil
 println("testVar is equal to \(testVar!)")
} else { 
 println("testVar is equal to nil")
}

Thursday 26 March 2015

Share Image and Video to Instagram

In one of my application i have to post image and video on Instagram, so i post here how can we do that in simple way.


First of all we save the image/video and then share it to instagram

for this you can refer this link


whether it is image or video you have to save it to somewhere


  • For image you have to store it  first in .igo format
  • I have used here AFNetworking framework to download video.
  • This common function  will save your image in application folder and video in photo library as image can be directly share via document picker.

-(void)saveImageorVideo{
    UIImage *viewImage;
//i have checked media type you can pass constant as well
    switch ([[self.dictPublishConfirm objectForKey:@"media_type"] intValue]) {
        case 1 :{
            viewImage = imgMain.image;
            NSString*path = [self saveImage:viewImage path: [NSString stringWithFormat:@"%@_%@.ig",PATH_IMAGE,self.strAdID]];
            strImagePath = [NSURL URLWithString:[[NSString alloc] initWithFormat:@"file://%@", path]];
            [self shareToInstagram];

            break;
        }
        case 2:{

            NSURL *strVideoPath = [NSURL URLWithString:[self.dictPublishConfirm objectForKey:@"media_video"]];
            NSURLRequest *request = [NSURLRequest requestWithURL:strVideoPath];
            AFHTTPRequestOperation *operation = [[AFHTTPRequestOperation alloc] initWithRequest:request];
            NSString*path = [NSString stringWithFormat:@"%@_%@.mp4",PATH_VIDEO,self.strAdID];
            videoPath = [NSURL URLWithString:[[NSString alloc] initWithFormat:@"file://%@", path]];

            operation.outputStream = [NSOutputStream outputStreamToFileAtPath:path append:NO];

            [operation setCompletionBlockWithSuccess:^(AFHTTPRequestOperation *operation, id responseObject) {
                NSLog(@"Successfully downloaded file to %@", path);
                if (UIVideoAtPathIsCompatibleWithSavedPhotosAlbum(path)) {
                    UISaveVideoAtPathToSavedPhotosAlbum(path, self, @selector(video:didFinishSavingWithError:contextInfo:), nil);

                }

            } failure:^(AFHTTPRequestOperation *operation, NSError *error) {
                NSLog(@"Error: %@", error);
            }];

            [operation start];
            break;
        }
       default:
            break;

}

}
//for share to instagram

- (void)shareToInstagram
{
    NSURL *instagramURL = [NSURL URLWithString:@"instagram://"];;
    if ([[UIApplication sharedApplication] canOpenURL:instagramURL])
    {

        CGRect rect = CGRectMake(0,0,0,0);
        //CGRect cropRect=CGRectMake(0,0,612,612);

        if([[self.dictPublishConfirm objectForKey:@"media_type"]isEqualToString:@"1"]){
        self.docFile.UTI = @"com.instagram.photo";
        self.docFile = [self setupControllerWithURL:strImagePath usingDelegate:self];
        self.docFile.annotation = [NSDictionary dictionaryWithObject:@"CatchGram" forKey:@"InstagramCaption"];
        [self.docFile presentOpenInMenuFromRect: rect  inView: self.view animated: YES ];
        } else {
            NSURL *instagramURL = [NSURL URLWithString:@"instagram://camera"];
            if ([[UIApplication sharedApplication] canOpenURL:instagramURL]) {
                [[UIApplication sharedApplication] openURL:instagramURL];
            }
          }
    }
    else
    {
        NSLog(@"Instagram not installed in this device!\nTo share image please install instagram.");
    }
}


//document picker function

    - (UIDocumentInteractionController *) setupControllerWithURL: (NSURL*) fileURL usingDelegate: (id <UIDocumentInteractionControllerDelegate>) interactionDelegate {

    UIDocumentInteractionController *interactionController = [UIDocumentInteractionController interactionControllerWithURL: fileURL];
    interactionController.delegate = interactionDelegate;
    return interactionController;
}


//share video after it is downloaded

- (void)video:(NSString *)videoPath didFinishSavingWithError:(NSError *)error contextInfo:(void *)contextInfo
{
    if (error != nil) {
         NSLog(@"Error: %@", error);
    }
    [self shareToInstagram]; 
}


Thats it you are done.

Please note

Alternatively, if you want to show only Instagram in the application list (instead of Instagram plus any other public/jpeg-conforming apps) you can specify the extension class igo, which is of type com.instagram.exclusivegram


For video

you can post video this way as well

The undocumented Instagram Video Hook let you share videos to Instagram quite like the Camera Hook
and so you have something like
URL: instagram://libraryPath parameter: AssetPathComment parameter: InstagramCaption


NSString *instagramURL = [NSString stringWithFormat:@"instagram://library?AssetPath=%@&InstagramCaption=%@",videoURL,[videocaption stringByAddingPercentEncodingWithAllowedCharacters:[NSCharacterSet URLHostAllowedCharacterSet]]];      
  if ([[UIApplication sharedApplication] canOpenURL:instagramURL]) {
[[UIApplication sharedApplication] openURL:instagramURL];
  }